MemLabs - Lab1
MemLabs is an educational, introductory set of CTF-styled challenges which is aimed to encourage students, security researchers and CTF players to get started with the field of Memory Forensics.
Each challenge has a description along with a memory dump file. We are supposed to get all the flags using memory forensics tools (mainly volatility).
You can read more about MemLabs here: MebLabs
Challenge Description
My sister’s computer crashed. We were very fortunate to recover this memory dump. Your job is get all her important files from the system. From what we remember, we suddenly saw a black window pop up with some thing being executed. When the crash happened, she was trying to draw something. Thats all we remember from the time of crash.
Note: This challenge is composed of 3 flags.
Challenge file: MemLabs_Lab1
The first thing to do with a memory dump file is to identify the operating system, for that we use imageinfo plugin.
$ volatility -f MemoryDump_Lab1.raw imageinfo

We can see volatility has a lot of suggestions for the profile, usually the first one is sufficient.
Next we check the running processes using pslist plugin.
$ volatility -f MemoryDump_Lab1.raw --profile Win7SP1x64 pslist
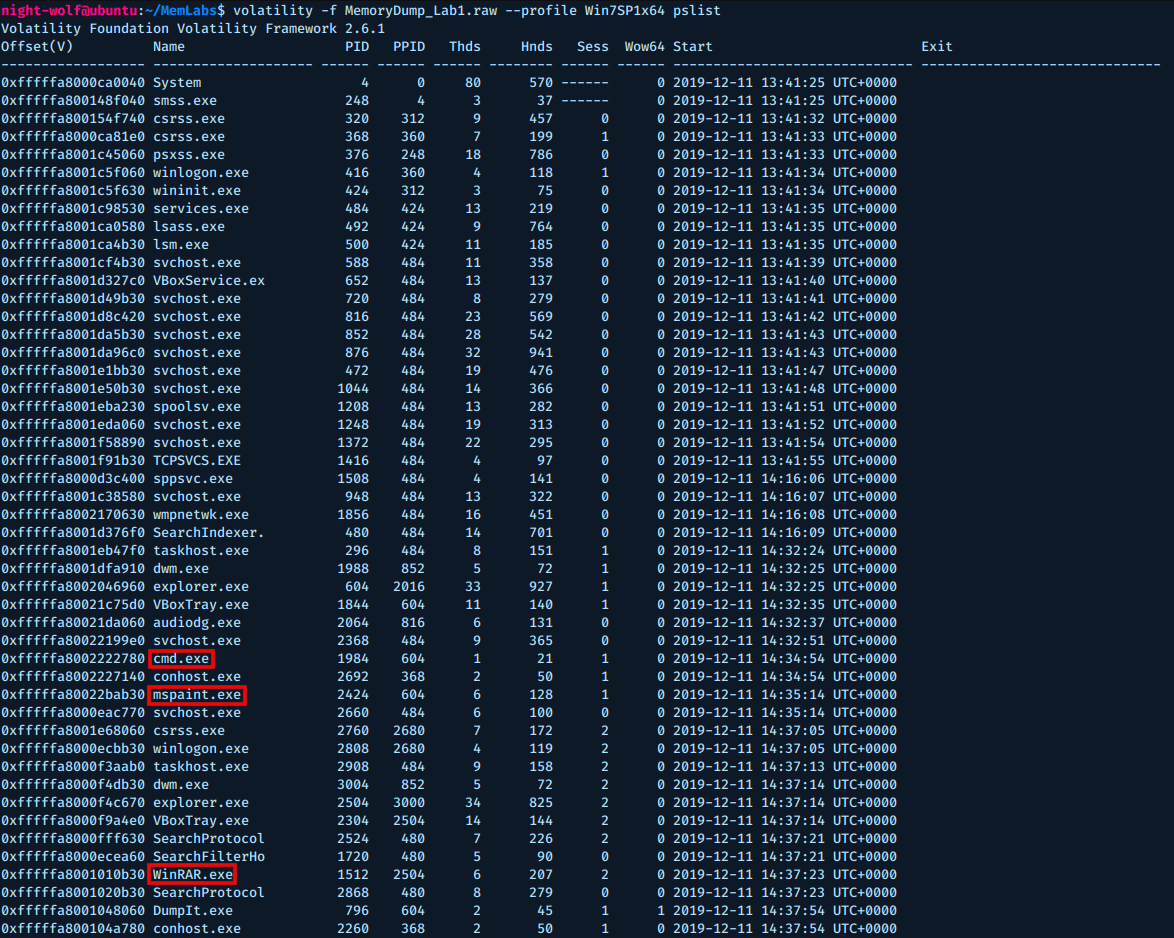
There are 3 interesting processes here, let’s start with cmd.exe. This process indicates that commands were executed on the system.
We can use consoles plugin to see the output
$ volatility -f MemoryDump_Lab1.raw --profile Win7SP1x64 consoles
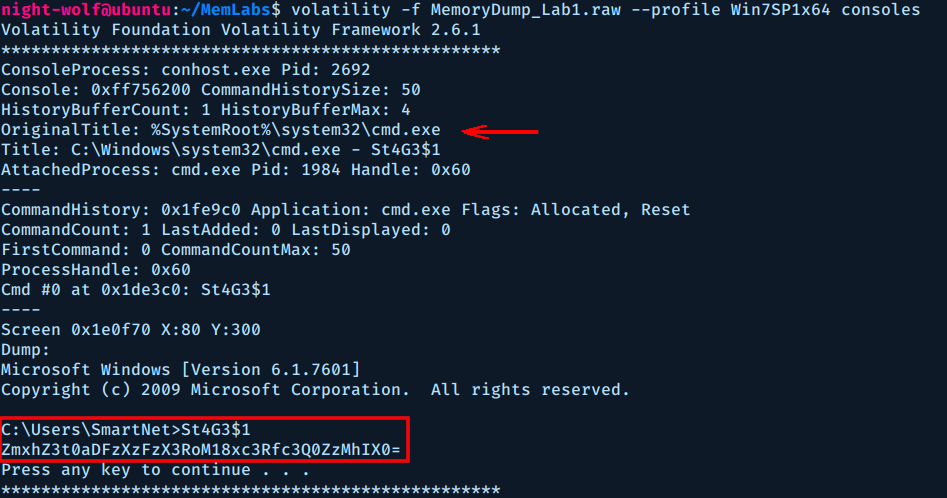
If you look closely to the output of the command St4G3$1, you can spot some Base64 text. If we decode it we get the flag of stage 1.
$ echo ZmxhZ3t0aDFzXzFzX3RoM18xc3Rfc3Q0ZzMhIX0= | base64 -d
flag{th1s_1s_th3_1st_st4g3!!}
Flag 1: flag{th1s_1s_th3_1st_st4g3!!}
Next we will focus on the second interesting process, which is mspaint.exe. The PID of this process is 2424.
If you go back to the challenge description, we can see that the user was drawing something (using mspaint of course).
After some googling, I found that we can dump the mspaint’s process memory to extract the image back.
So let’s use memdump plugin to extract some data.
$ volatility -f MemoryDump_Lab1.raw --profile Win7SP1x64 memdump -p 2424 -D lab1_output/
The output is written to 2424.dmp, we need to rename it to 2424.data to be able to open it in Gimp.
After playing a bit with the width and offset. I got an image which is somewhat flipped. I rotated it 180 degrees then flipped it horizontally and Voila!, I got the flag.
 |
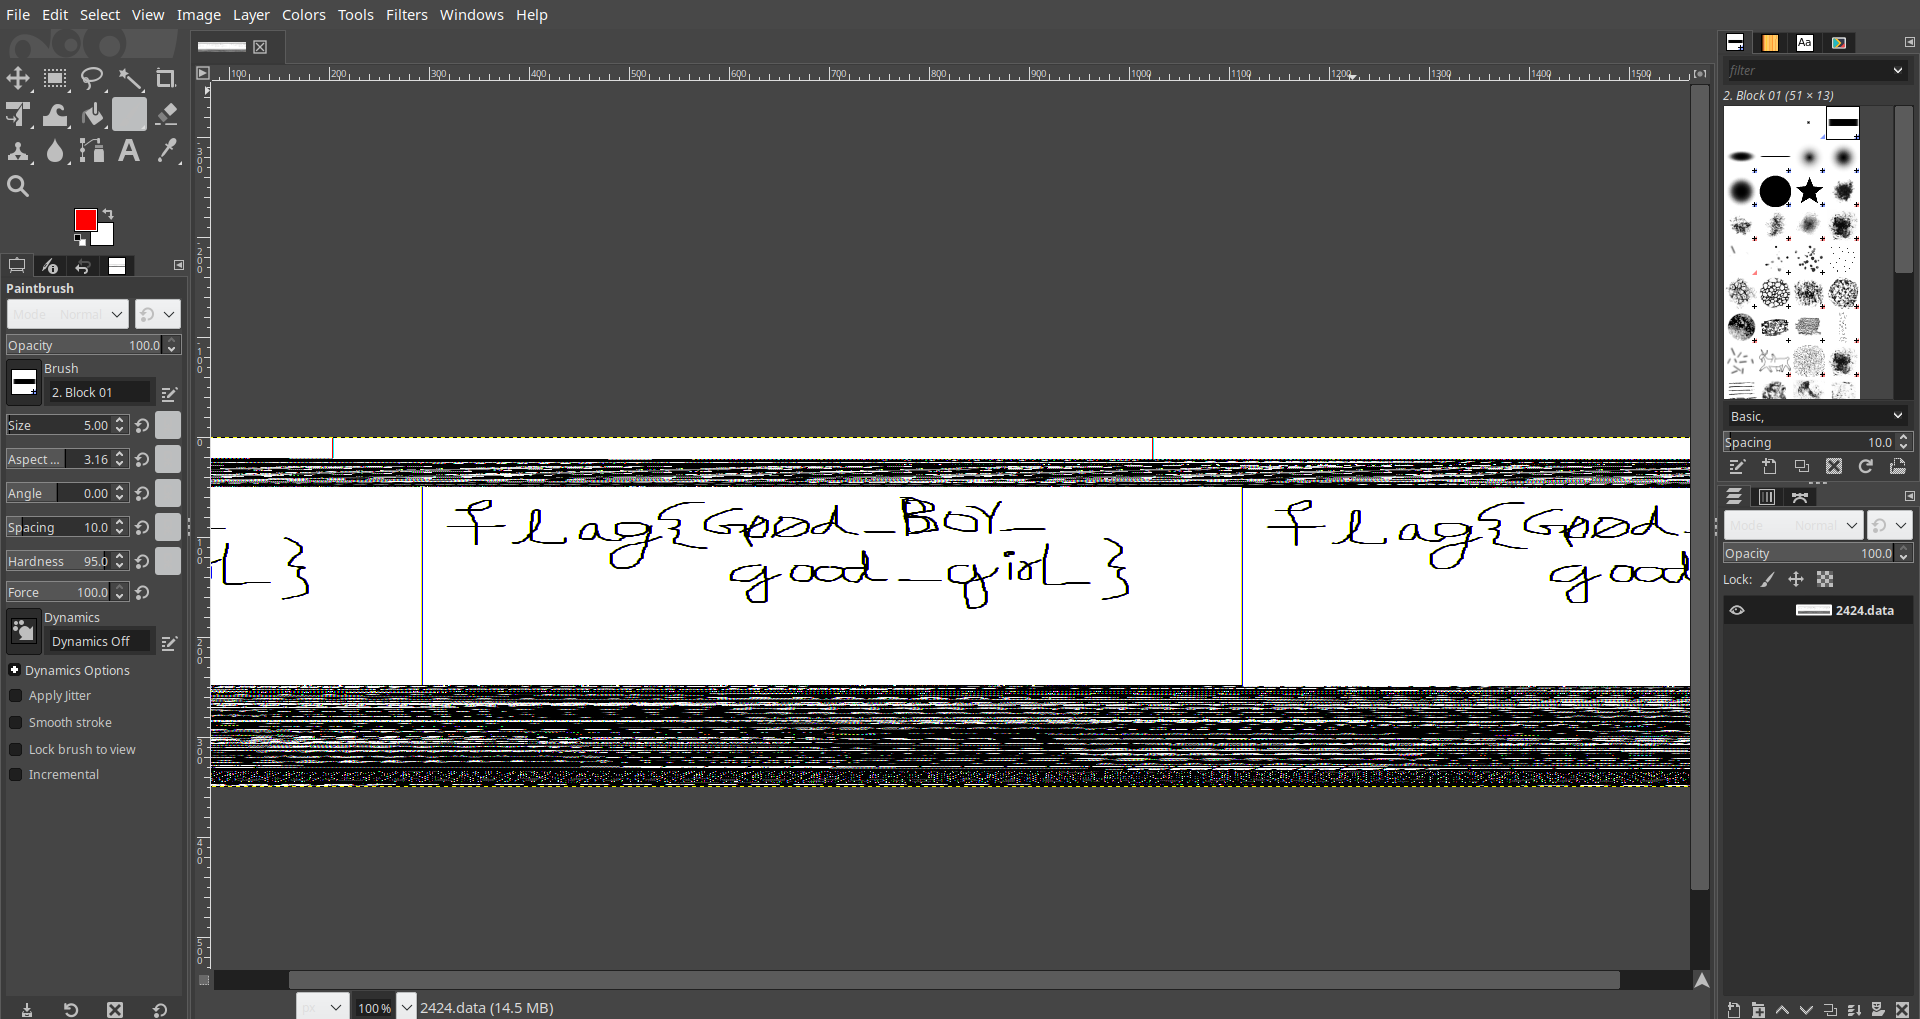 |
Flag 2: flag{G00d_Boy_good_girL}
The third interesting process is WinRAR.exe with PID 1512, we can use cmdline plugin to see the associated command line.
$ volatility -f MemoryDump_Lab1.raw --profile Win7SP1x64 cmdline | grep WinRAR
Volatility Foundation Volatility Framework 2.6.1
WinRAR.exe pid:   1512
Command line : "C:\Program Files\WinRAR\WinRAR.exe" "C:\Users\Alissa Simpson\Documents\Important.rar"
Great, we got the name of the rar file which is Important.rar (looks important).
Next we can use filescan plugin to get the psychical offset of that file in memory.
$ volatility -f MemoryDump_Lab1.raw --profile Win7SP1x64 filescan | grep Important.rar
Volatility Foundation Volatility Framework 2.6.1
0x000000003fa3ebc0      1      0 R--r-- \Device\HarddiskVolume2\Users\Alissa Simpson\Documents\Important.rar
0x000000003fac3bc0      1      0 R--r-- \Device\HarddiskVolume2\Users\Alissa Simpson\Documents\Important.rar
0x000000003fb48bc0      1      0 R--r-- \Device\HarddiskVolume2\Users\Alissa Simpson\Documents\Important.rar
We can pick any of these offsets, To dump the file we can use dumpfiles plugin.
$ volatility -f MemoryDump_Lab1.raw --profile Win7SP1x64 dumpfiles -Q 0x000000003fa3ebc0 -D lab1_output/
Volatility Foundation Volatility Framework 2.6.1
DataSectionObject 0x3fa3ebc0   None   \Device\HarddiskVolume2\Users\Alissa Simpson\Documents\Important.rar
The file is dumped under the name file.None.0xfffffa8001034450.dat, let’s rename and unrar it.
$ mv file.None.0xfffffa8001034450.dat Important.rar
$ unrar e Important.rar

UNRAR 5.61 beta 1 freeware      Copyright (c) 1993-2018 Alexander Roshal

Extracting from Important.rar

Password is NTLM hash(in uppercase) of Alissa's account passwd.

Enter password (will not be echoed) for flag3.png:
The file is password protected, but we can see a comment that says the password is the NTLM hash of Alissa’s account passwd.
To get the password hash, we can use hashdump plugin.
$ volatility -f MemoryDump_Lab1.raw --profile Win7SP1x64 hashdump
Volatility Foundation Volatility Framework 2.6.1
Administrator:500:aad3b435b51404eeaad3b435b51404ee:31d6cfe0d16ae931b73c59d7e0c089c0:::
Guest:501:aad3b435b51404eeaad3b435b51404ee:31d6cfe0d16ae931b73c59d7e0c089c0:::
SmartNet:1001:aad3b435b51404eeaad3b435b51404ee:4943abb39473a6f32c11301f4987e7e0:::
HomeGroupUser$:1002:aad3b435b51404eeaad3b435b51404ee:f0fc3d257814e08fea06e63c5762ebd5:::
Alissa Simpson:1003:aad3b435b51404eeaad3b435b51404ee:f4ff64c8baac57d22f22edc681055ba6:::
Windows stores two hashes with each password, delimited by colons. The first one is an extremely insecure, obsolete hash using the LANMAN algorithm. Windows operating systems since Vista no longer use LANMAN hashes, so they are filled with a dummy value starting with “aad”.
The second hash is the newer NTLM hash, which is much better than LANMAN hashes, but still extremely insecure and much more easily cracked than Linux or Mac OS X hashes.
The desired NTLM hash is f4ff64c8baac57d22f22edc681055ba6 (remember it must be in uppercase).
After decompressing the file, we get an image with the flag.

Flag 3: flag{w3ll_3rd_stage_was_easy}